I Grew Microgreens for Restaurants – These Are the 5 Easiest to Grow at Home for Super-Healthy Harvests in Tiny Spaces
They are definitely suitable for beginners and can go from sowing to harvesting in as little as 10 days

Growing microgreens makes it possible to get homegrown harvests in the smallest of spaces, such as a windowsill. In the absence of space, you want surefire success, so here are my picks for the five easiest microgreens to grow at home.
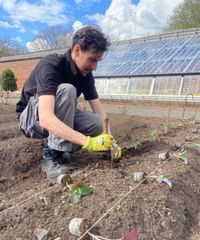
I have experience growing a wide range of different microgreens for restaurants, including a Michelin-starred restaurant. For something so small, growing microgreens can be intense. In different gardens, I was growing up to 15 different types of microgreens at a time, sowing over 50 trays a week, and harvesting them daily to send to the chefs.
In my time growing microgreens, I have seen first-hand how some can be simple and reliable. And I have spent time trying to master the challenging ones. To help guarantee your success, here I pick my five easiest microgreens to grow at home and provide some sowing tips for each that I have picked up over the years.

1. Pea Shoots

Pea shoots are the tender top tips of pea plants and a popular microgreen I have always grown for chefs.
They are usually added as garnishes to dishes for their dainty appearance. Pea shoots bring a tender, sweet flavor and are rich in vitamins and minerals, making them great for adding to salads or sandwiches for texture and a fresh taste.
Growing pea shoots is very simple. Before sowing, you can soak the seeds to speed up the germination process – but this is optional. I have found they germinate reliably quickly without that step.
You can use any pea seeds, get microgreen pea seeds at True Leaf Market, or use packets of dried peas, like these at Walmart, but dried peas definitely need soaking before sowing.
Fill a seed tray or pot with compost and spread the pea seeds on the surface. You can sow thicker than normal, with only half an inch between each. Cover these with an inch of compost and gently water them. Place this tray on a bright windowsill, and the shoots should start showing through the soil within a week.
Once the shoots reach 4-6 inches tall, snip them with scissors or garden snips just above the bottom leaves. This encourages regrowth, and you can usually get two or three harvests.
See the range of pea seeds at Amazon
See the range of pea seeds at Burpee
See the range of pea seeds at Botanical Interests
2. Nasturtiums

The flowers, leaves, and stems of nasturtiums are all edible. I have grown nasturtiums for restaurants for years and painstakingly picked leaves and flowers, usually for garnish but also to make a nasturtium oil.
There is no denying that nasturtium leaves look great adorning plates, and they have a peppery flavor that brings something different to dishes. Fresh nasturtium leaves can also be added to salads, stir-fries, soups, or pestos.
Plant nasturtium seeds thickly over the surface of compost and cover with a thin layer of more soil. Nasturtiums will germinate best in the darkness, so place another tray over the top for up to a week until the seedlings show.
Once you remove the cover, place the container on a warm, bright windowsill. In fall or winter, you may need grow lights to supplement natural light. Once the stems reach 4-6 inches and the leaves are around an inch wide, carefully snip the nasturtium leaves to add to your dishes.
There are many nasturtium varieties to choose from, but I had great success with ‘Alaska Mix’ – a variety with lovely variegated foliage. You can get ‘Alaska Mix’ nasturtium seeds at Burpee.
See the range of nasturtium seeds at Amazon
See the range of nasturtium seeds at True Leaf Market
See the range of nasturtium seeds at Botanical Interests
3. Radish

Every gardener knows radishes for being fast-growing vegetables, and they are also super-speedy microgreens. Growing radishes in this way can go from sowing to harvesting in under 12 days. They are definitely one of the easiest microgreens to grow at home, and can bring a bit of spice and valuable vitamins to any plate.
Fill your tray with potting mix and plant the radish seeds generously over the surface. Then gently press them into the soil and cover with a fine layer of more soil. It is better to water the trays from below, by placing them into a larger container filled with water. It is a gentle way to water plants, where the soil can soak up the moisture.
Put the container on a bright windowsill and keep the soil moist by watering from below as required. You can start harvesting radish as microgreens once the stems reach at least two inches tall.
I like growing darker varieties of radish as microgreens, as they look spectacular on plates. I opt for something like these radish ‘Sango Purple’ microgreens seeds at True Leaf Market, as they grow quickly and the leaves are a vivid purple.
4. Arugula

Arugula is another fast-growing microgreen, from sowing to harvesting in around 10 days. It is quick and simple to get peppery leaves to add to salads, top pizzas, and use as a garnish. Arugula seedlings may be small to the eye, but they pack a punch and are full of beneficial vitamins, minerals, and antioxidants.
Fill your trays with seed compost (though you can use a potting mix) and flatten the surface to sow onto. Sprinkle the seeds thickly over the surface, but don’t cover the arugula seeds with more soil. Water the soil from below and then cover the trays with another tray to block the light.
Place the container somewhere it can get temperatures of 65-75°F. You can use seedling grow mats to start microgreens, such as this waterproof seedling mat at Amazon, to provide extra warmth to trays.
Keep the compost moist and remove the cover once the seeds germinate. Now they need lots of light, and the trays need to be rotated every few days on a windowsill to stop them bending too much.
Harvest the arugula microgreens when the stems reach at least two inches tall. Take care when harvesting them with scissors so as not to get lots of compost with them.
5. Mustard

Mustards also offer a peppery flavor and come in a range of colors to grow as microgreens, from light green to dark red.
A popular variety I grew was ‘Red Mustard Frills’ and it had darker leaves with a mustardy kick that was highly sought after by the chefs I was growing them for.
Spread the seeds thickly over seed compost, potting mix, or coco coir – you can get a coco coir seed starting soil at Burpee that makes a suitable, lightweight growing medium for growing microgreens. Just like arugula, do not cover the mustard seeds, but do gently push them down to get good surface contact with the compost.
Cover the tray so the seeds germinate in darkness, removing it after only a couple of days. By this stage, a good proportion of seedlings should have appeared. Place the tray in bright, indirect sunlight to ensure the mustard grows healthily and you avoid leggy seedlings.
Keep the soil moist, and the microgreens can be harvested after around seven days, once they have developed their first set of true leaves.
See a wide range of mustard microgreen seeds to sow at True Leaf Market
If you aspire for delicious, healthy homegrown harvests, then why not consider growing superfoods? The term superfood refers to plants that are packed with nutrients and offer benefits in terms of health and well-being. And many of these superfoods can be grown at home, even in smaller spaces. This guide to the easiest superfoods to grow includes seven of these crops, and gives useful sowing and growing tips for each.

Standard nursery size sowing trays without drainage holes. To use for microgreens or for gently watering seed trays from below.

This seed starter contains sphagnum peat moss, peat humus, perlite, and more. It is specially formulated for growing seedlings and cuttings.

These carbon steel trimming snips have long 190 mm chromium blades and are perfect for carefully harvesting microgreens.
