How to paint a dresser without sanding – for a beautiful new look without the elbow grease
Skip the sanding with these five expert painting tips and tricks


Design expertise in your inbox – from inspiring decorating ideas and beautiful celebrity homes to practical gardening advice and shopping round-ups.
You are now subscribed
Your newsletter sign-up was successful
Want to add more newsletters?

Twice a week
Homes&Gardens
The ultimate interior design resource from the world's leading experts - discover inspiring decorating ideas, color scheming know-how, garden inspiration and shopping expertise.

Once a week
In The Loop from Next In Design
Members of the Next in Design Circle will receive In the Loop, our weekly email filled with trade news, names to know and spotlight moments. Together we’re building a brighter design future.

Twice a week
Cucina
Whether you’re passionate about hosting exquisite dinners, experimenting with culinary trends, or perfecting your kitchen's design with timeless elegance and innovative functionality, this newsletter is here to inspire
Starting a new painting project and hearing that you have to sand first is becoming just as tiring as the sanding itself, and leaves many of us wondering if we can skip it entirely.
The good news? Painting a dresser without sanding is super simple to do, and with painted furniture ideas becoming more popular, cutting this step out of our home projects is a great way to save time and energy.
So, while sanding may be a traditional step for getting a smooth finish, professionals have explained how to complete this DIY project without sanding – or skimping on quality.
Painting a dresser without sanding
The material your dresser is made of can make a difference in how to approach painting without sanding. Painting laminate furniture without sanding, for instance, requires some kind of deglosser, liquid sandpaper or a heavy-duty bonding primer after cleaning for the paint to adhere correctly. When painting wooden furniture, on the other hand, you can get away with a regular furniture primer, and maybe a top coat depending on the type of paint you use.
Here is what the experts recommend.

1. Clean and degrease the surface
Much like cleaning walls for painting, cleaning the surface of your dresser is important to ensure any layers of primer or paint you add go on smoothly, and do not peel away later down the line.
To do this, Jacky Chou, designer and principal of Archute, recommends removing any hardware, such as knobs or pulls, and cleaning the surface with mild detergent and water to remove dirt, grime, and oils. A good option is Dawn dish soap, available at Walmart, but for a more heavily soiled or old dresser, you may wish to consider sugar soap, a cleaner designer to tackle built-up grease before DIY projects.
Design expertise in your inbox – from inspiring decorating ideas and beautiful celebrity homes to practical gardening advice and shopping round-ups.
‘Rinse well and allow the dresser to dry completely before proceeding,’ he suggests.
Sugar Soap | $11.09 at Amazon
I always use sugar soap before I start any furniture painting project to remove dust and grease without scrubbing. I mix the powder in a bucket with the recommended amount of water before dipping a clean cloth in and rubbing it over the surface, watching the grease melt away.
2. Use liquid sandpaper on laminate furniture
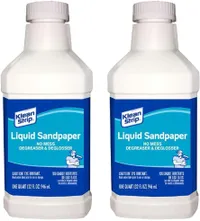
Furniture that has a laminated coating, such as IKEA furniture, for instance, will benefit from a deglossing solution, or liquid sandpaper, to help toughen up the smooth surface ready for paint. These paint-on products still skip the laborious sanding step in that you do not need to scrub the dresser or use power tools, but will add a little more time to the project as you wait for it to sit and do its job.
While this is an option, it is recommended if you want to paint on laminate dressers, paint over stained wood, or on wooden dressers that have previously been waxed, to stand the test of time.
Klean-Strip 2-pack Liquid Deglossing Sandpaper | $18.74 at Amazon
This deglossing liquid sandpaper is highly rated by users on Amazon and is a great additional step to painting any laminate surface without having to actually sand it with a simple wipe-on-and-leave formula.
3. Add a tough bonding primer
When you aren't sanding, a high-quality primer is worth the investment – otherwise, a new paint job won't last longer than a few months, warns Joshua Bartlett, home improvement expert and founder of I’ll Just Fix It Myself
Knowing how many coats of primer you need is essential too, following the manufacturer's instructions where possible. Otherwise, go for a safe two coats, allowing each to dry before applying the next for good coverage and a long-lasting finish. It helps to dissemble the dresser to apply this sometimes too, Josh adds, to make for easier painting without having to work at awkward angles.

Joshua Bartlett has been responsible for the upkeep of several homes, apartments, and rentals. He created I’ll Just Fix It Myself to help others learn alongside him, sharing what he has learned through his decades of successes – and failures – to tackle home improvement.
4. Pick a specialized furniture paint
While your paint finishes are important for the look of your room, the type of paint formula you pick is arguably more so, particularly for a furniture piece as heavily used as a dresser.
When painting a dresser without sanding, James Donald, paint expert and founder of Aesthetic Paints says you have three main options:
Mineral Paint: Mineral Paint is an excellent option as it adheres well to various surfaces without the need for priming or heavy sanding. It is also waterproof, stain-resistant, and does not require a topcoat. A good option is Fusion Mineral Paint, available at Amazon, he adds.
Chalk Paint: Chalk paint, such as FolkArt Home Decor Chalk Paint, available at Amazon, provides a beautiful finish and requires minimal surface preparation making it ideal for painting furniture without sanding. It also has a few different colors to choose from.
Milk Paint and Bonding Agent: If you are looking for a non-toxic option for painting a dresser without sanding, then you could opt for mixing milk paint with a bonding agent. This creates a paste that adheres well to surfaces without sanding, James explains. It is ideal for painting wooden furniture. When looking for a good bonding agent, I recommend trying Damite acrylic bonder, from Amazon.

James Donald has over 12 years of experience in the paint industry. He created aesthetic paints to help advise clients on the best types of paints for their needs, and how to use them for the best effect.
5. Complete with an optional topcoat for longevity
Finally, to finish any quick and easy paint project (whether you have sanded or not) adding a durable topcoat is the best way to make sure that your paint lasts – especially when working on a hardworking piece like a dresser.
‘Applying a clear water-based polyurethane topcoat will extend the life of the paint and protect the dresser's surface. With this shield in place, things are sturdy and less likely to break under regular use,’ advises home improvement expert, Joshua Bartlett. ‘Regarding application and drying times, stick to the manufacturer's guidelines,’ he recommends. ‘When given a range, err on the side of fewer coats, as too many could make the top coat look yellow.’
FAQs
What happens if you do not sand a dresser before painting?
If you skip out on sanding a dresser before painting and do not complete the other preparatory steps such as cleaning and priming correctly, then the paint may begin to peel away over time. If you use a good bonding primer, and especially if you add a hard-wearing top coat, the paint should last without having to sand.
Can you paint over varnished wood without sanding?
If you have a piece of varnished furniture, then it is best to sand it before applying a primer and paint. That being said, you could skip this step if you clean the surface thoroughly and use a good, high-quality bonding primer to offer a durable surface for the paint to adhere to. Painting straight onto silky varnish may mean the paint struggles to stick, leading it to peel off over time and with everyday use.
When it comes to painting a dresser without sanding, sticking to the other steps of traditional prep work is essential for a long-lasting new look. When painting, make sure to dismantle the dresser into its individual sections for the best effect, removing cabinet doors and drawers from the unit and painting them laying flat to avoid as many drips in paint and primer as possible.
Allow them to dry completely before reattaching them to avoid marking the paint. Keep any hinges or handles you remove together in a bag inside the dresser so that you do not misplace them as you work.

Chiana is Homes & Gardens’ kitchen appliances editor. With a lifelong passion for cooking and baking, she grew up experimenting in the kitchen every weekend with her baking-extraordinaire Mom, and has developed a great understanding of how tools and appliances can make or break your ideal relaxing kitchen routine.

