How to grow Jerusalem artichokes – tips from an experienced vegetable grower
Everything you need to know about growing these increasingly-popular edible tubers at home

Jerusalem artichokes are edible tubers that have been used as a food for centuries. After being overlooked for many years, they have become fashionable again and are now commonly seen on restaurant menus. As tubers tend to command a premium price, there are great merits to cultivating your own.
The unique vegetable, also known as sunchoke, is really simple to grow as part of any vegetable garden ideas. Tubers are planted in spring and often left to their own devices to grow quickly, before being harvested from fall onwards. The tubers, which can come in different shapes, sizes, and colors, have a sweet and nutty taste and are full of minerals and fiber.
I have grown Jerusalem artichokes in different vegetable gardens during my time as a professional kitchen gardener. I planted, maintained, and harvested them for lots of chefs that viewed them as a fantastic crop for the colder months.


Jerusalem artichoke tubers can come in colors ranging from white to red
How do you grow Jerusalem artichokes?
Jerusalem artichokes are perennial plants native to North America and are a member of the sunflower family. They are grown as annuals for their edible tubers. Jerusalem artichokes are different from globe artichokes, which are highly ornamental plants that are grown for their edible flower buds. We take a closer look at how to grow Jerusalem artichokes at home.

Tubers can either be smooth or knobbly - depending on the variety
How to plant Jerusalem artichoke tubers
Jerusalem artichokes are grown from tubers, which can be bought from stores or online - such as these Jerusalem artichoke tubers available at Amazon. When you grow your own Jerusalem artichokes, you can either leave a few tubers in the soil, or store and replant some of the harvested tubers for next year’s crop.
Once Jerusalem artichokes have been planted, they can be difficult to get rid of as new plants will regrow from even the smallest sliver of tuber left in the ground. For this reason, I have found it beneficial to grow them in raised garden beds. The crop could grow here for a few years before being dug out and moved as part of a crop rotation.
The plants want to grow in a sunny position and in a well-draining soil type. If you have heavy soil then it may be beneficial to add compost or well-rotted manure to improve the structure and drainage. Jerusalem artichokes do not want to sit in soggy and waterlogged soil, as this can lead to the tubers rotting. As Jerusalem artichokes can grow up to three metres tall, it is also best to avoid planting them in very windy spots.
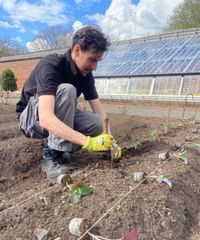
Jerusalem artichoke tubers are best planted in early spring after the risk of frosts has passed for your US hardiness zone. The tubers need to be planted three inches deep and around 18 inches apart. Tubers can be cut into pieces to give yourself more to plant, however make sure that each section has buds on them. Give the tubers a good watering once planted and they should start to sprout within a few weeks.

Jerusalem Artichoke tubers are planted in spring
How to grow Jerusalem artichokes in containers
Jerusalem artichokes are perfectly suitable for vegetable garden container ideas. If your soil is very heavy, or you are short of space to grow the plants in the ground, then large containers can give you a good harvest of tubers.
It is important to choose a big pot, ideally one at least 18 inches wide and deep, that is filled with a free-draining compost. Never use old garden soil in pots as it often sits too wet and will cause tubers to rot, and the soil can carry disease.
Jerusalem artichokes grown in pots will need more watering during the summer, but planting the tubers in containers makes them easier to harvest and removes the chance of them resprouting in the garden for years to come.

Crops grown in pots may produce less tubers per plant
Care and maintenance of Jerusalem artichokes
Once planted in the vegetable garden, the great news is that Jerusalem artichokes actually require little maintenance. They are quite a drought tolerant vegetable and only need to be watered in really dry spells. Regular watering during a period of dry weather definitely helps to make sure that the tubers swell to a good size.
The plants do not need additional fertilization during the growing season. They can benefit from mulching with compost or well-rotted manure to improve the level of moisture in the ground and to suppress competition from weeds. Those two materials are some of the best fertilizers for a vegetable garden and will also add nutrients into the soil, so they will suffice and no other additional feeds are required.
Once the artichokes grow to around one foot high, you can earth up the crop like you would do when growing potatoes. Bringing surrounding soil up around the plant helps both in terms of making the plant sturdier against the wind, but it can also help improve the yield of tubers.
If you are in a windy area, also consider putting in stakes and lengths of wire or string between to support the tall stems. When there is a fear that winds can damage plants, you can cut the stems back to around 5-6 feet tall in mid-to-late summer. This will help the plant concentrate all its energy onto developing the tubers.
The signs for when to harvest Jerusalem artichokes come when the leaves have fallen off the plant and the stem is dried out. This tends to come from fall onwards. Gently lift plants and remove the tubers from the ground. As the tubers do not store for long, and the plants are hardy enough to overwinter outside, harvest regularly as required throughout winter.
FAQs
How long does it take for Jerusalem artichokes to grow?
Jerusalem artichokes are fast growers and can take between 120 and 150 days to go from sowing the tubers to harvesting. The plants themselves can grow to a whopping 10 feet in height and each can produce up to a dozen tubers.
Can you grow Jerusalem artichokes from seed?
Jerusalem artichokes are grown from tubers and not from seed like many other vegetables. The plants rarely flower and, when they do, they are often sterile. You will not find Jerusalem artichoke seeds for sale from reputable retailers. Seen as you only need a few tubers to get a crop, and you can replant ones for future harvests, you should have sufficient Jerusalem artichokes after one purchase of tubers.
One of the main pros to Jerusalem artichokes is their ease. When planning a kitchen garden it is really helpful to try to keep things simple. As well as growing fuss-free crops, such as Jerusalem artichokes, it also helps to consider perennial vegetables, such as growing asparagus or looking at perennial onions that can give you harvests year-after-year.
