How to grow kalettes – discover a new winter vegetable that is stunning as well as tasty
Kalettes are a cross between two classic cold-season vegetables and are really easy to grow

You may not have heard of kalettes, but they are a fantastic winter vegetable that has surged in popularity in recent years. The plant produces a tall stem that is covered in small florets of purple and green crinkly green kale leaves, which are harvested whole.
Kalettes are a simple and attractive vegetables to grow. They also produce long harvests for many months. I grew and harvested kalettes for chefs, who used them as an alternative to Brussels sprouts during the winter.
When you are planning what vegetables to plant this coming year, why not consider kalettes? This new and exciting crop offers lots of benefits, both in the garden and to the grower - as the florets are full of vitamins, minerals, and antioxidants.


Kalettes make striking additions to a vegetable garden
What are kalettes?
Kalettes have been specially bred as a cross between kale and Brussels sprouts. Also often called ‘flower sprouts’ the plants produce tall stalks covered in rosettes of tightly-packed frilly florets of kale leaves.
The plants look stunning and can be harvested through winter, as the hardy vegetables can overwinter outside in the kitchen garden without any issue.
When to grow kalettes

Kalettes are a cross between kale and Brussels sprouts
Kalettes can be grown from seed starting in early spring, or are available from nurseries, garden centers, or online from mid-spring onwards. Young plants or seedlings can be transplanted into the garden once the risk of frosts passes for your US hardiness zone and the soil warms up in late May or June.
The plants are then grown and looked after throughout summer and should be ready to harvest from October onwards, depending on when you planted your kalettes.
How to grow kalettes from seed
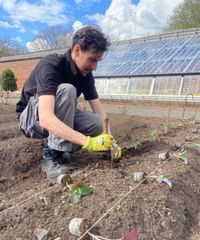
Kalettes are either sown undercover or directly into a prepared seedbed in the garden. The approach you take will be dictated by your climate and set-up - however I always preferred to sow kalettes in modules indoors to plant out come late spring. This way the young plants are strong and healthy and at less risk of being nibbled by the slugs as they start to germinate.
Start sowing kalettes in March indoors in a greenhouse or on a bright windowsill. Fill your module trays or pots with quality seed compost and sow two or three seeds at a depth of half an inch. Putting more than one seed per small pot or module increases the likelihood of getting a successful germination, and you then thin out the weaker seedlings down the line to leave just one strong young kalette plant.
Kalettes want temperatures of between 65 to 85°F to germinate. Depending on your climate, and whether your greenhouse is heated, it may be beneficial to use a heated propagator or heat mat, both available at Amazon, to give a consistent level of heat to the seedlings. Keep the compost moist, but not waterlogged, and do not let it dry out.
The young kalettes can be planted out once they reach around six inches tall and are large enough to handle. Harden the seedlings off for a few weeks to get them prepared for being moved outdoors, before planting them in their final position from May onwards.
Sow kalette seeds directly outside into a weeded and raked seedbed from April onwards, once the risk of frosts has passed and the ground is workable. Thinly sow the seeds in drills around 24 inches apart and thin out the seedlings to an ultimate spacing of 24 inches between plants.

Autumn Star is an early variety of kalettes that can provide a crop from October onwards. The variety has superb vigour and produces high yields of kalettes each year
Where to plant kalettes

Kalette seeds require warmth to germinate
Kalettes are a brassica in the cabbage family. They should not be planted in the same spot as other brassicas grew in the last few years, as part of a crop rotation plan. By using crop rotation you can keep soil healthy and prevent the build-up of diseases in the soil, such as clubroot.
The plants want to be planted in a soil type that is rich, fertile, well-draining and with a soil pH of 6.5-7. It is recommended to conduct a soil test prior to planting to check the nutrient make-up and identify any deficiencies that need to be addressed. Adding lots of organic matter, such as compost or well-rotted manure, in the months prior to planting can help to boost moisture retention in the soil and the nutrient levels.
Kalettes ideally want full sun to partial shade and protection from strong winter winds. As they do grow quite tall, it can be beneficial to stake the plants if you live in a windy area to make sure they stay upright throughout the winter.
Kalette care tips

Kalettes want to grow in a sunny spot in the garden
- Brassicas benefit from being firmed in well at the time of planting. So, when planting in May or June, ensure your kalettes are pressed down into their planting spot and the soil around the roots are well firmed down. By doing this, the plants will be well supported in their spot and at less risk of wind rock as they develop - an issue that can be capable of ripping roots from the ground and causing plants to fall.
- Adding a slow-release, balanced fertilizer at the time of planting can help to provide additional nutrients to help the kalettes grow healthily. Mulching around the plants will also prevent competition from weeds, help the soil hold more water, and boost the soil’s fertility as it decomposes.
- Cover plants with fine netting to provide a barrier against insects that are attracted to brassicas, including cabbage white butterflies, whitefly, caterpillars, and flea beetles. This covering is best applied immediately after planting and kept on the plants throughout summer, to avoid your precious kalettes being munched by hungry pests or birds. An example of fine netting to use is HOTBEST Garden Mesh Netting, available at Walmart.
- Keep the kalettes well-watered, the soil wants to be moist throughout the growing season but not waterlogged as this can cause rotting. The plants want consistent moisture to grow and develop the many florets. A soil moisture meter can be beneficial to make decisions on when to water plants. Take care to water the soil rather than the foliage, however, as soaking the leaves from above is a watering mistake that can promote fungal diseases, such as powdery mildew.
- Kalettes will benefit from additional fertilizing to provide a good yield. It is best to use balanced fertilizers throughout the season and to avoid using high nitrogen feeds - as these will encourage the excess growth of leaves rather than the tight florets you are after. One example of a good balanced feed to use is Scotts All Purpose Flower & Vegetable Continuous Release Plant Food, available at Amazon.
How to harvest kalettes

Kalettes produce an abundance of florets to harvest
Kalettes have a long growing season and can take from 110-140 days to be ready to harvest, depending on the variety you are growing. The crop can be harvested from mid-fall onwards, though they will taste best after being subjected to a few frosts.
The crop is ready to pick when the leaves start falling off the plant and the individual florets are around two inches in diameter. The lower florets will be ready to pick the earliest, so start harvesting from the bottom of the stalk upwards. It is a simple process to twist the florets from the stem, or you can cut them with a sharp knife at the base.
Harvest the kalette florets as-and-when required throughout the winter. The plants will be fine outdoors throughout the colder months and can provide a harvest all the way into late winter or early spring.
You can bring the harvesting period forward by cutting off the tip of the plant when the lowest rosettes are around an inch in diameter. Remove the top growing point of the plant and the florets will all start to mature at a similar rate. This gives you a more concentrated harvest, rather than a long period of cropping all through the winter.
FAQs
Can you grow kalettes in pots?
Kalettes can be grown in pots as part of a vegetable container garden. It is important to choose a large pot that is at least 12 inches wide and deep, to accommodate the plant's good root network and keep it anchored in the soil.
The pot must have holes in the bottom for drainage and be filled with a quality potting compost. A pot that is 12 inches wide and deep will be large enough for one kalette plant. Kalettes growing in pots will need to be watered and fed more often than plants in the ground, especially during periods of dry weather. When watering plants in containers, always use your fingers to check the moisture level below the surface to avoid overwatering plants.
When you start a vegetable garden, one of the most important points to consider is to grow what your household eats the most. However, there is also always room for some experimentation in gardening, and unique vegetables like kalettes are certainly worth exploring.
