

Refinishing existing cabinets is the perfect solution when you want a new kitchen but don’t have the energy, time or money to invest in ripping the old one out and starting again.
‘Rather than replacing with new, refinishing your kitchen cabinets not only saves money but it’s also a more eco-friendly and sustainable solution,’ says Lucy Searle, Global Editor in Chief for Homes & Gardens. ‘Painting kitchen cabinets is a great option for wooden or painted kitchen furniture, for example, and it can easily be done over a weekend. All in all, refinishing is a great way to update kitchen cabinets without replacing them.'
‘Before you even begin this process, the cabinets need to be super clean,’ advises Looeeze Grossman, founder of The Used Kitchen Company. ‘Wipe them down with a good multi-purpose cleaner or dish soap and water, which also works really well. Follow with a sugar soap formation to remove any residue. Once this is done you need to lightly sand the cupboards down. Use a low-grade sandpaper and go gently over the surface. Fill in any chips with wood filler.’
Below, we take you through the process of refinishing kitchen cabinets, step-by-step.
How to refinish kitchen cabinets
As well as painting or staining kitchen cabinets, there is the option to varnish them to refinish the surfaces. It will give the room a makeover without the need to remove kitchen cabinets that are tired or damaged and install kitchen cabinets you’ve selected to replace them.
‘After sanding, I’d always choose a non-toxic finish to varnish the cabinets,’ adds Looeeze. ‘It’s more sustainable and less harmful to your household members and pets. I use an extra-wide paint brush to stain the facia of the cabinet, using a waterproof finish.'
Here's how to refinish kitchen cabinets, whatever the existing finish, with advice from experts.
1. Protect the area
Before you start, make sure the kitchen is well protected. This means laying down plastic sheeting, building paper (which is more eco-friendly) or canvas cloths on the floor as well as over the countertops, appliances, table and chairs and any other items within the space. This will protect them from dust and sanding during your refinishing process.
Next, you want to remove the doors and drawers from your cabinets. Remember to label or number them so you know which door or drawer goes where once you’re finished. Now you need to plastic and tape off the insides of the cabinets to protect from dust and don’t forget to cover up backsplashes too.
2. Prepare the surfaces
Preparation is key, and the results will depend on how much care and attention you give during the preparation process. ‘To refinish wooden kitchen cabinets, first remove the doors, handles and hinges,’ says Ryan McDonough, interior design expert at My Job Quote. ‘Clean all surfaces with sugar soap to remove stubborn grease and dirt. Lightly sand with a fine grit paper and work with the grain rather than against. Hand sanding is best for working around detail such as bevelling on cupboard doors and decorative trim.’
Cleaning the doors and drawers takes a lot of hard work. You can scrub and wash them down with synthetic steel wool and soap and water and for tough greasy stains, use TSP (available at Amazon) and water. Leave everything to dry once you’re done.
3. Clean hardware
As well as the cabinet doors and drawers, it’s a good idea to clean handles and hinges too. Place in a large bowl of soapy hot water for around 30 minutes and scrub gently to remove any grease and residue. Rinse with clean water and dry. If needed, you can always give them a polish.
3. Strip the cabinets
Make sure you open all windows and doors to ventilate the room. Even better if you can take the cabinet doors and drawers outside. Next, you need to check what finish is already on the timber as this will determine which stripper agent is needed. In most cases, a varnish remover will do the job. After you’ve stripped the finish, you can repair any holes or scratches in the wood.
If yours is a painted kitchen, it may not be made from timber. If this is the case, skip this step and move on to sanding.
4. Sand kitchen cabinets
Next, either hand sand with sandpaper or use a sanding sponge to scuff the existing finish and provide an adhesive surface. Ideally you should use a low-grade 100 or 15-grit sandpaper.
A hand-held vacuum dust buster is ideal for clearing up the dust afterwards, though it is also worth wiping down the sanded surfaces with a slightly damp microfiber cloth to remove all traces of dust. Allow to dry before moving on.
5. Refinish in your chosen varnish, wax or paint
Finally, you can apply your chosen finish. For wood kitchen cabinets, you might use a product that brings out the natural beauty of the wood, such as Restor-A-Finish or Feed-N-Wax (both at Amazon). You can find tips for painting kitchen cabinets in our separate guide, including the best paint finishes to choose.
Once you’re done and it’s all dry, replace the handles – or install kitchen cabinet handles in a different material or style – and fix the doors and drawers back into place.
How can I refinish cabinets without sanding?
To refinish cabinets without sanding, simply use some mineral spirits and a rough sponge to clean and gently scuff up the area.
What is the difference between refinishing and refacing?
Refinishing kitchen cabinets involves changing the finish or color of the existing material whereas refacing kitchen cabinets means placing a new material on top.
-
 How to get rid of flying termites – 5 tips to prevent these pests from damaging your property
Flying termites represent a significant warning of a termite problem in your home – here's what experts say about how to deal with them
-
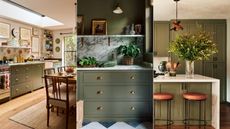 Olive green kitchen cabinets are a huge trend for 2024 – interior designers share how best to embrace this versatile shade
Olive green is a trending shade this year. Here, interior designers share their favorite olive green kitchen cabinet ideas for a stylish space

