How to secure furniture to a wall – 4 steps for peace of mind
It isn't just people with children that need to secure furniture, the experts warn


The furniture in our home serves as more than just decorative pieces. Hardworking storage units, decorative shelving, and media units are all used day in and day out without a second thought. But what if one of them were to fall?
Unless you have children or boisterous pets, you might not have thought about securing furniture to a wall, but with constant use comes the constant risk of a heavy bookshelf or sturdy cabinet toppling over – resulting in thousands of injuries per year in the US*.
This is how to secure furniture to a wall as a quick and easy DIY project to prevent damage to both you and your home.
How to secure furniture to a wall
While not every piece of furniture needs anchoring for safety, it is best to secure anything heavy or tall to a wall to prevent tipping, begins Jay Sanders, licensed contractor and owner of Castle Dream Construction and Maryland Contractors. He suggests always securing bookshelves over three feet tall, dressers larger than two feet tall, and TV stands that hold a lot of heavy technology.
‘If you have kids under five years of age or have pets, it becomes mandatory,’ he warns.

1. Pick your anchor
The first step to securing furniture to a wall is determining which type of anchor will work best. Generally speaking, there are two kinds – L-shaped brackets, such as these anchors from Amazon, designed for large, heavier pieces such as bookshelves or media consoles, and furniture straps, also available at Amazon, for smaller items such as dressers and small cabinets, explains Jay Sanders, licensed contractor. ‘These can be screwed directly into the wall studs,’ he adds.
More often than not, your furniture piece will come with these or will come with a recommendation in the care manual.
Design expertise in your inbox – from inspiring decorating ideas and beautiful celebrity homes to practical gardening advice and shopping round-ups.
2. Locate the wall studs
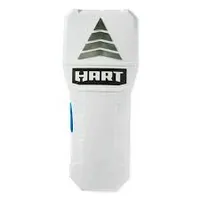
Just as you would hang a heavy mirror or hang artwork without damaging walls, you need to locate your wall studs before drilling into the wall, continues Josh Rudin, professional contractor and owner at ASAP Restoration. This can be easily done using a stud finder and some patience, he says.
‘This will ensure that the furniture is secured to the strongest point in the wall where it is less likely to be torn out.’
HART 3-LED Stud Finder $9.88 at Walmart
You can easily locate your wall studs with this affordable device from Walmart.
3. Position the furniture and attach anchors
With the wall stud located, you can move to position the furniture, contractor Josh Rudin says:
‘Make sure that your furniture is facing the right way before attaching anchors or brackets to either the wall or the furniture you are securing. This will help to keep the furniture where you want it and how you want it to look when you secure it to the wall.
‘Then, follow the manufacturer's instructions for attaching anchors to the furniture and the wall. This may involve drilling pilot holes into the furniture, the wall, or both. Then insert the anchors into the furniture and the wall.’
How many anchor points you add will depend on the size and weight of the furniture you are securing, warns Joel Anderson, furniture and kitchen designer. For some pieces, it is not a one-and-done. For most items, at least two three-inch screws securing the piece at the top should be enough to offer security, however, Joel suggests any item over four feet tall benefits from additional chores being added at the middle.
‘Remember to consider the screw length to ensure the piece is secured in place, the thickness of the back of the furniture, and the gypsum board (drywall), and not go past the center of the stud size to prevent accidental contact with wiring and plumbing.’
4. Deal with any cord management
If you are mounting a media unit or TV stands, you will also need to deal with cable management, reminds Josh Rudin, professional contractor. This is best done as you are mounting the unit rather than after as it can help to organize cables behind the TV.
‘To best secure the TV to the wall, use a mounting system safely secured into the studs, and collect any power cords in a cable tube that is also secured to the wall,’ he recommends.
FAQs
Can you secure furniture to a wall without drilling?
It is possible to secure furniture to a wall without drilling using adhesive anchors, furniture straps, or weighting the base of the piece, but these solutions might not be as secure as drilling into the wall stud.
How do you secure furniture to plasterboard?
If you cannot secure a furniture piece to a wall stud, it is important to use the right screws and heavy-duty plasterboard fixings to help hold it in place and spread the weight of the item. Using traditional wall studs for something so heavy could result in the furniture piece pulling away from the wall and even taking some of the plaster with it.
With the unit secured, finish the project with some cleaning tips to remove dust and debris that can exacerbate allergy symptoms. Use the best vacuum cleaner with a HEPA filter to deal with dust or sawdust, and finish with a damp microfiber cloth to clean the unit before restocking it with your belongings.

Chiana has been at Homes & Gardens for two years and is our resident 'queen' of non-toxic living. She spends most of her time producing content for the Solved section of the website, helping readers get the most out of their homes through clever decluttering, cleaning, and tidying tips. She was named one of Fixr's top home improvement journalists in 2024.
