


Here's Everything My Builder Told Me NOT to Do in My Home Remodel, and Why I'm Glad I Ignored Them
How ignoring the "rules" turned my renovation into a home full of personality

From the moment I set my sights on our Edwardian home, previously decorated in the 1970s and then left to rot, I knew I didn't want to play it safe with the remodel.
The builders had a long list of rules (see: opinions) of things they thought I shouldn't do if I wanted a smooth home renovation or an easy-to-resell home. "Don't alter the layout", "stick to neutrals", "keep the details impersonal". But, thankfully, my mother raised a rather stubborn home decorator.
So I ignored some advice – but I also bent a few renovation rules. And in doing so, I discovered that the choices that initially made my builder raise an eyebrow are exactly the ones that give my home its soul. From bold colors to unexpected details, each “no” I overruled has a payoff I wouldn’t change for the world.

7 Things I Did in My Reno That My Builder Warned Me Against

Sure, I might not have had a fully fleshed out vision before we started ripping the place apart (one of the things I would do differently in my remodel if I had the time again), but I certainly knew I wanted to create a home filled with character, personality, and that honored the home's history, too.
And following their every rule felt like it went against that vision. Of course, there are things I HAD to listen to, like recommendations from my electrical walkthrough, or positioning of plumbing, etc. But when it came to the creative decisions, I'm so glad I stood my ground.
Here is a list of everything my builder told me NOT to do in my renovation.
1. Adding an Arch and Moldings to My Entry

The entryway to our home was always a rather disappointing space. It's extremely narrow, lacks daylight, and when we first bought it, it was covered in swirly brown 1970s carpet.
Of course, three years into our slow renovating project, the floor has been improved upon (we've reinstated a traditional Victorian mosaic tile), the walls are still wallpapered but have been upgraded from a textured baroque to beige ticking stripes, and the front door has been replaced with a stunning stained glass window timber door painted in Farrow & Ball's Bancha.
So, you get the picture – we've gone pretty traditional. So to suit that, I wanted a decorative archway installed, complete with decorative corbels and plaster molding. The builders saw it as one big outdated headache, but now that it's up, it instantly softens the space, adding a real centerpiece on arrival and giving the entry endless character. It's the first impression I'd always hoped for.
2. Buying Secondhand Fireplaces

I'm a big believer that details make all the difference in your home.
I'm lucky to benefit from two chimney breasts in my connecting living and dining rooms, but unlucky that the previous owners had the original fireplaces removed. So, I went hunting for secondhand ones.
The builders were totally against this idea, claiming it would be too risky, a nightmare to install, and too much effort. Not only did they underestimate my Facebook Marketplace skills, but they also underestimated how passionate I was about creating these focal points. I'm now the proud owner of one marble fireplace in the dining room (that I picked up for $180) and a carved wooden surround that has been upcycled using Little Greene's Ganache.
3. Opening Up the Entryway

Then there was my staircase wall. The one standing between the entryway and my dining room.
My builder warned that knocking it down to create an open-plan entryway might be risky, that it could compromise the structure or flow, but I insisted.
The second it came down, not only did we uncover that the staircase wasn't properly supported from beneath, meaning we could thankfully remedy this with urgency, but it has opened up the downstairs in the most lovely way.
The light now floods into the entryway from the dining room windows, and there are fewer awkward angles and doorways to contend with upon entry, creating a much easier flow. Plus, we've been able to add in a new decorative staircase banisters and posts recovered from an old pub.
4. Creating a Boot Room Under the Stairs

One of my favorite rule-breaking moments is our DIY boot room under the stairs.
The builders insisted it was too small to be useful, but I had a vision. Without a dedicated dumping zone for such paraphernalia, my entry drove me mad, so carving out a transitional space that could help declutter coats, shoes, and dog accessories felt like an impossibility in my 100-year-old home.
As it turns out, under the stairs is actually the perfect spot for a boot room. It's right there upon entry, tucks neatly out of sight, and makes use of a formally overlooked space. We've added two large cupboards in the sloped space, and under the full-height space, have managed to carve out a small nook for a bench seat, coat hooks, and baskets for shoes. Yes, it's tiny, but perfectly formed and one of my favorite spots in the house.
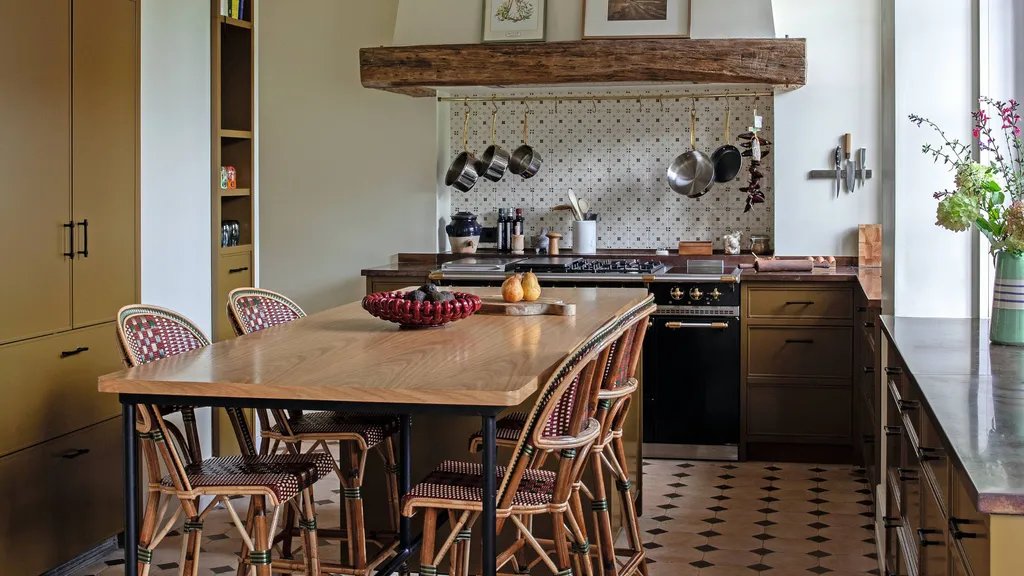
5. Adding Wall Lights to Every Room

Unless they're particularly up with lighting trends, most builders and electricians will insist rows of spotlights are the perfect lighting solution for every room. They're discreet, modern, cheap... but ugly.
So obviously, I had other ideas. As well as a central big light in every room (some for more decorative purposes than practical), I asked them to add in wall lights in almost every room. They protested, saying it was old-fashioned and unnecessary, but a layered lighting scheme is a must for creating a cozy and curated vibe.
They create warmth, depth, and drama, as well as help to highlight furniture, art, and architectural details in a way that spotlights could never. It's a small addition, but something I'll never want to forgo again.

Add some subtle print to your bedside or reading nook with this articulated sconce from Anthropologie, complete with a cottage-style floral ruched shade.

Finished with an antique-style burnished brass, these clean-curved wall lights are perfect for a kitchen, to highlight a piece of art, or to add some industrial toughness to the living room.

For a budget-friendly, stylish buy, these cone-shaped sconces are mounted on a black metal fixture with a distinctive intertwined knot detail to give it a contemporary meets farmhouse look.
6. Paneling the Powder Room

We also removed an original bathroom downstairs to create a bigger kitchen (there were a lot of walls up and down in this remodel), meaning we wanted to create a powder room to replace this lost facility.
The new space is pretty small, and I decided on cladding the walls in floor-to-ceiling (including the ceiling) tongue-and-groove wall paneling to create a cocooning effect. True to nature, the builders warned it was not the "done thing" and could look too heavy.
Of course, I did it anyway and drenched it all in Farrow's Cream by Farrow & Ball. The result is dramatic, yes, but in a cozy and cohesive way. Guests love it, and it really pays off to go bold in such a tiny footprint.
7. Color Drenching

Finally, as room color ideas were being discussed and decisions finalized, my paint choices were a particular topic of contention.
Not only were they not keen on my love of color (builder's love to lean neutral for resale value), but also my all-five-walls application, a.k.a. color drenching. But for me, color is personality, and I wanted my rooms to feel joyful, confident, and enveloping.
Plus, you'll actually find that by taking the color across the ceiling too, you lose that strong contrast from a white ceiling that makes your wall colors appear so bold. It also helps create an illusion of more space or height, thanks to the lack of harsh lines, and is a designer-approved way to work with color.
Looking back, every “no” (or "really???") I chose to ignore became a “yes” that defined the personality and uniqueness of my home. What my builders saw as risky or unnecessary, I see as the details that make my home feel truly mine.
The lesson? Interior design rules are useful, but they’re not gospel. Some of the most memorable, beautiful, and functional spaces come from trusting your instincts, experimenting, and daring to put your own stamp on things.
